Monday, June 20, 2011

Tuning the Suzuki Bandit 1250

This is a topic that comes up in bits and pieces all over the Net, so it's worth recording my experiences in one place.  This is what worked for me.  If you aren't confident, competent or know what you are up to, don't do this.  Do it at your own risk.

ADJUSTING THE THROTTLE POSITION SENSOR (TPS)

Firstly, it's worth getting some baseline figures on the Bandit's injection system.  Purchasing a dealer mode switch part number  enables you to check the fault codes and the throttle position sensor (TPS) setting.  It should be -C00 with the cursor in the middle position as shown below.  If the cursor is elsewhere (i.e. up top or down low), the TPS is slightly out of adjustment.

Any other codes, check the manual.


To adjust it, you will need the bike in dealer mode.  The connector is under the right hand side cover with a white dust cover on it.


Connect the switch (you can short the plug with a paper clip to achieve the same effect), turn on the bike and turn the switch "on".  If all is well you will get -C00.  If the cursor is anywhere else, find the TPS, which is on the left hand throttle body, and slightly loosen the two security Torx bits, which are type T20H with the hole in the middle.  Do not remove them, and do not remove the TPS from the throttle body.


You will see the cursor move with even undoing it, so take time and a little patience to get the cursor in the right place.  DO NOT overtighten it, because you may crack the housing.  In theory you should adjust it with the throttle stop screw between the throttle bodies, but it's buried deep and I don't know anyone who has managed to get to it.  Is it critical?  Suzuki say good is C00 and don't mention the cursor.

BALANCING THE THROTTLE BODIES


Do this after you have replaced the plugs and cleaned/replaced the air filter.  I don't plan to list those steps here, as if you don't know how to do that. you shouldn't be messing with this.  Balancing the throttle bodies will give smoother idle, smoother low speed running and reduced surging.

To do this, you will need a 4 carb balancer.  I use the Morgan Carbtune Pro:


There are various schools of thought on balancing, but I used the Suzuki method listed in the service manual as "Use of Mode Select Switch".

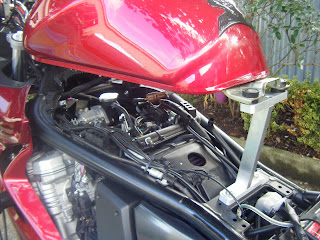
You put the bike on the main stand, and remove the tank and prop it up so you can access the throttle bodies with the fuel hose and fuel pump still connected.  I use a Metrick metal (www.metrickmetal.com) tank prop:


  Connect the dealer mode switch, and run the bike until it is warm.  Wait until the fan kicks in (don't adjust anything if the fan is running though).  The dealer mode switch automatically sets the bike in synchronisation mode.  (Some people don't use the switch and apply vacuum to the IAP valve, but I don't think it's necessary).

Stop the engine and attach the Carbtune lines to the vacuum ports on the manifolds.  The number 1 line is shown marked below - pull it off an replace it with the Carbtune line and repeat for the other three.

Make sure the mode switch is"on" and run it.  Check the 4 readings are the same and use number 2 cylinder as the base reference.  Getting the 4 columns even is the aim.  The speedo will show "C13" which means the IAP isn't getting vacuum because it's disconnected from the manifolds.  Ignore that

The levels are adjusted with the air screws on the throttle bodies.  The air screw by the number one injector is shown below.  Turning it clockwise makes the column rise.  Don't unscrew them too much - small turns are all that are needed.

Give the throttle a "blip" when you think it's right, as you may have to fiddle a bit.

If you get it right, smooth running results.  If your bike idles poorly afterwards, a common fault is due to leaving the vacuum lines disconnected from the IAP sensor.  Any vacuum leak means she won't run.

Sunday, June 12, 2011

Pilot Road 3

I fitted a Pilot Road 2 to the rear last July, and 8,000 km later it is still looking pretty good.  I ride in all weather and it sticks.  I had a Pilot Road (just the ordinary one) on the front, which has just been replaced after about 12,000 km.  It still had about 2.5 mm on it, but was wearing on one side, and the rain is here in a big way.  I was going to fit a PR2 to match the rear, but the shop only had PR3s in stock and said the 2s were getting hard to source and I'd have to wait a few weeks.

So, I now have a new Pilot Road 3 on the front, which I scrubbed in today (it's not raining for once).  The advice I had from the shop is to expect similar life to the 2, but a better wet weather tyre.  The tread pattern is quite different and acts like a squeegee.  The horizontal bands evidently force water out each side as they flex together under load.

I am normally fairly oblivious to tyre type, but the new tyre allows me to turn in faster, and is very responsive.  Almost felt like whole new suspension!  I am actually hoping for the rear to wear out so I can get one on the back (how sad is that.....)

Anyway, here is is with the odd tread pattern.  I like it.

V Strom Hand Guards

I have just fitted V Strom hand guards.   They look good, although at maximum lock touch the fairing.  You can lock the steering and still have a gap, and I don't mind as you rarely have to move the bars lock to lock.  They keep all the wind and rain off the top of the fingers, and complement hot grips keeping the underside of your hands warm.  Good for cold NZ winter riding.


I purchased the DL650 full kit off Ebay, which comes with the bar end spacers, longer screws, guards and fitting hardware.  I also bought a left hand DL1000 guard by itself (there's not a DL1000 kit as the thou comes with the hand guards from new, whilst the 650 does not).  The DL1000 left hand guard is made for a hydraulic clutch, which is pretty much identical to the Bandit's.  The DL650's is made for a cable clutch and is quite a different shape.  You can see them below (the 650 one is being held in the top of the shot).


You can probably make the 650's fit, but it wouldn't be a good fit.

The right hand guard has a modified pivot pin on which it sits.  Imagine the standard pivot with a longer thread at the bottom to take another nut and washer to "sandwich" the underside of the guard, and with a nut welded to the top, on which the guard sits with a screw going through to hold it on.


The left hand guard (for the 650) comes with a different pivot bolt as the guard is different.  This is the part that caused me a problem, as to fit the DL1000 guard, you need that pivot.  I have bodged together a couple of nuts to hold it for now, and have ordered the pivot bolt.

It is far cheaper to order the 650 kit and the DL1000 guard and pivot than to try and buy each piece separately.   If you want to do it, order the:

OEM DL650 hand guard set part number 57300-27824-291 (USD$50) - Ebay, and the rest from Alpha Sports:

OEM DL1000 hand guard part number 57541-06G10-291 (USD$19)
Screws (2) to mount the top part of the guard 09125-06118 (USD$1.53 ea)
Washers to mount under the screws (2) 09160-06130 (USD$1.13 ea)
Pivot bolt for left hand side (note that this is the part number for the DL1000 right hand pivot, which is the correct size.  The left hand one won't fit. (1) 57431-06G00 (USD$21.90)

Saturday, June 4, 2011

Rectifier relocation

The rectifier was replaced recently under the world wide recall.  It runs quite hot, and doesn't get a lot of airflow where it is behind the engine.  I bought a rectifier relocation bracket from www.metrickmetal.com and about 30 minutes later, all was done.  Looks good and gets better airflow.

Playing with the toys

A friend bought himself a Yoshimura TRS from EBay and I fitted to for him today.  His bike is the factory tourer setup, so I added an extension to the hanger so it would sit lower and clear the bags (clears by a good 2").

Naturally we had to test it out, so the Wainuiomata Coast Road did nicely..

He's got a Dale Walker kit and a K and N coming, so we will be taking his bike to Stage II specs as soon as I fit it all for him.