
The stock headlights on the Bandit are pretty underwhelming. I have higher intensity Narva bulbs which look "whiter", but they don't help much at night. I fitted HID lights, as various forums report great success.
I have bought a kit (2 lights) from a Seller called Factory Kiss off Ebay Australia for AUD$39.99 with free shipping. The units are made in China, but at that price it's worth the risk. I have bought the following:
Xenon HID Light Kit Slim Ballast H7 6000K 55W 12V

The bulbs have a standard H7 base, but do not fit the Suzuki GSF1250 spacer that sits on the back of the standard H7 bulb. Rather than make something up, I bought a pair of them, also from EBay Australia. Search for:
H7 HID Bulb Spacer Adapter: Honda & Suzuki CBR GSXR Etc
These fit on the back of the bulb to allow the standard spring clip to hold the bulb firmly in place.
I mounted the ballasts under the front fairing onto heavy duty velcro. I ran the low beam from a fused hot feed from the battery, that is switched by a relay powered from the park light circuit. The reason for this is that the standard headlight circuit powers down when the bike is started, which creates an "on-off" for the bulbs and ballasts which isn't great for their longevity. This way the lights will come on with the ignition and not dim on starting. Some people have gone straight to the standard circuit with no issues, but if you are able to make it unswitched, this is probably better.
Hooking the units to the battery to test them is startling. You can look at the standard bulb, but not at the HIDs. They are BRIGHT.
The kit seems to be well made. Good wiring, weatherproof connectors, aluminium cased ballasts, and at that price cheaper than buying two new H7 bulbs. There's plenty on EBay, and even many of the well rated American kits seem to be sourced ex China, so it's well worth trying.
I fitted them this morning. It took a couple of hours, but that was experimenting with different mounting options. In the end I went with velcro as it's strong, provides a cushion and even if it comes loose, I'd know well before the unit could ever fall out.
Here's the before and after pictures of the light:
Before (yes, the light is on)

After. (It's so bright it overwhelms the camera)

I started by removing the inner cowl liner, screen and instruments. I then mounted the main ballast and secondary transformer using heavy duty velcro onto the inside of the front left fairing:

It's right out of the weather and no way it's going to shift from there.
I then removed the stock bulb from the low beam (upper holder). You can see it beside the HID bulb for comparison. The H7 bulb has a spacer piece, which is essentially the large black base you can see on the bulb on the left. If you don't have a collar on the HID bulb, the spring clip won't hold it firmly in place.
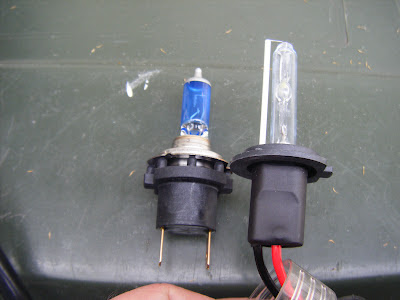
I took the new collars I had bought, and had to do a little filing to have them to the same dimensions as the stock spacer. What is important is the lip so the spring clip provides enough pressure. This is the new spacer before I filed it down. I had to take a couple of mm off the little spacer pegs and also from the outside edge of the collar as it was slightly larger in diameter. It was easy to do. You could probably make something out of plastic washers too if you wanted.

And here is is filed and ready to go.

Once that was done, it fitted easily. Make sure you line the locating peg up on the bulb base with the cutout in the headlight mount.
I pulled the input 12v leads out through the rubber grommet provided with the kit. The holes I filled with a dab of silicone sealant.
With the bulb in place, I pushed the bulb wires and supplied grommet through the GSF's waterproof cap. By gently pulling on the wires and pushing on the grommet, it snugs up against the Suzuki waterproof cap and provides a good seal. I then connected all of the leads up from the power units to the bulb, and cable tied them securely.
You can see it in the uppermost of the following photo. Those red and black leads have corrugated tubing on them now:

To power it, I ran a 12 V fused hot lead from the main wire I use to power a 12V accessory socket. I ran that into the switched side of a 12V 30A relay with its own internal fuse. The other side ran to the positive power lead of the bulb. The negative I ran to the negative for the power socket, which can be any suitable earth point.
To switch the relay, I spliced into the park light beside the headlight. The 12V there energises the relay coil and is not switched off when the bike is started. I used heatshrink and soldered the joints.
The relay mounted nicely on a bent steel strip to the uppermost left fairing mount bolt. The pic below shows it both as a closeup and in situ. I could have made it more accessible (have to remove the instruments to check the fuse), but more accessible = more weather, so this is a nice, dry, roomy place.


With the relay in place, I made sure I covered all the cabling with corrugated tube, cable tying it where it could move or rub.

So far I have just done the low beam, which as far as I can see has the same beam pattern, but what an amazing difference in light output. It literally is night and day over the stocker and I don't know why I didn't do this ages ago. I have soldered the main harness in, but in the event of a bad ballast, I just pull it off the velcro, unplug and swap.
My camera won't do it justice, but this side on photo shows how bright it is. The colour is a good match for the bright bluish-white LED park lights I have fitted already:

Here's a schematic of the relay wiring:

If you are doing a GSX1250FA, the OEM bulbs are H7 55W (low beam) and high is a HB3 60W. You would need to order two separate bulb types, so get yourself 55W 6000K bulbs of the appropriate type.
Here's a comparison with the standard setup. The camera doesn't do it justice:


It's a great topic related to the hids. Your blog also provied me that. HID is the latest invention in the headlight space. There is no better headlights are available in the market than the HID headlights. Hid conversion kit give the front of your vehicle, a superb look. In fact, the look of the front of any vehicle depends upon the look of the headlight and if you replace your old headlights with the HID ones, then the look of the whole front part of your vehicle will be changed and people will feel that, you have done make over to the whole front part of your vehicle, not only to the headlight.
ReplyDeleteThanks Liam.
ReplyDeleteGood website! I truly love how it is easy on my eyes and the data are well written. I am wondering how I could be notified whenever a new post has been made. I have subscribed to your feed which must do the trick! Have a great day!
ReplyDeleteelectric vehicle charging stations products
How about riding in a wet conditions. Isn't 6k reflect too much so you are totally blind in the raining afternoon?
ReplyDeleteOsuffsaquea_me2001 Heather Wang https://wakelet.com/wake/AgB4QgvaRlts6GPdnguhZ
ReplyDeletefromiztralvi
OtrudmesOque_ki Kim Romero https://www.stevenlehyaric.net/profile/orsolafayrliahtadlie/profile
ReplyDeletestochorileth
Npuginaka Byron Mancuso Fraps
ReplyDeleteScreenHunter Pro
WinRar
dragerroca
LED colors are smooth and clear. https://www.toseoledlighting.com/product-category/led-spotlights/
ReplyDeleteElectricity makes night travel safer with street lights. no deposit electricity texas
ReplyDelete